Sports

Fixing High School Strength and Conditioning.

My name is Deerick Smith and I am the Director of Strength and Conditioning at Southside School District in Southside Arkansas.  I am a Certified Strength and Conditioning Specialist through the NSCA and am currently in the Masters of Exercise Science Program at Concordia Chicago. I am the owner of Smith Performance specializing in online training programs for schools and individual clients.  In my daily job, I work all the male and female athletes at the school 7-12th grade.  There are many programs throughout the country doing a fantastic job with strength and conditioning however there are also many programs unknowingly putting athletes at risk.  The three biggest problems I see with Strength and Conditioning at the High school level are:

1-Programs that are too far advanced in terms of the athlete’s abilities.

2-Lack of understanding of Olympic lift programming.

3-Overuse of brutality to create mental toughness.

I cannot count the amount of times I have heard an athlete or coach say “we are following the University of _________ Strength and Conditioning program”.  The problem with this is the fact that they have no understanding of the progressions that led up to the exercises in that program. Many of the exercises being used could have had three years of progressions leading up to them. They also do not have the athletes at their school that are using that program at whatever university it may be.   Any division 1 even division 2 school is full of the best athletes from various High Schools across the country. What can be done with them is far different than what can be done with most athletes at the High School level.  A quote from Strength Coach Dan John resonates with me in terms of programming for High School athletes “anything works but not everything works” If you stick to a simple program then you will see results. If you bounce around from different method to different method then you will not achieve the results you could.

There is also a lack of understanding of the programming of Olympic lifts into strength and conditioning programs. Clean and Snatch variations can have a huge impact on the development of the High School athlete if taught and programmed correctly, they can also put the athlete at an increased risk of injury if they are not taught or programmed correctly.  When programming Olympic lifts, I never program more than five reps per set and usually do no more than three reps per set.  This is because the Olympic are so dependent on proper form, all lifts require technical abilities but with the Olympic lifts and their variations this greatly increases.  The more reps programmed the more stress on the CNS and the more the athletes form breaks down. I simply live by if you cannot do or coach an Olympic movement yourself, then don’t have your athletes do it! There are many progressions that go into learning the Olympic lifts and their variations. You don’t just simply program cleans into your workout without taking your athletes through the process of learning the different aspects of the clean.   There are many ways to achieve the stimulus that Olympic movements provide without doing the Olympic movements.

Lastly and one of the biggest problems I see are coaches trying to create mental toughness through brutality in the weight room or in training sessions.  While many may not agree with it my thoughts are if an athlete shows up every day on time and gives his or her full effort on the task at hand then they are already mentally tough. This world is full of soft individuals who simply cannot show up and do what is expected so to do this they are already ahead of a lot of the population. It is not our place as coaches to grind kids into the ground through brutal workouts that leave them laying on the floor drenched in sweat gasping for air in the name of “mental toughness”.  Special forces, Marines, and the Army and Navy do a lot of these type workouts and are some of the baddest men and women on the planet but that’s the key, they are MEN and WOMEN, not Jr High and High School KIDS.  I look at it through the lens of do my kids respect me or do my kids fear me, while both will get your athletes to buy in the first is the key in truly developing your program.

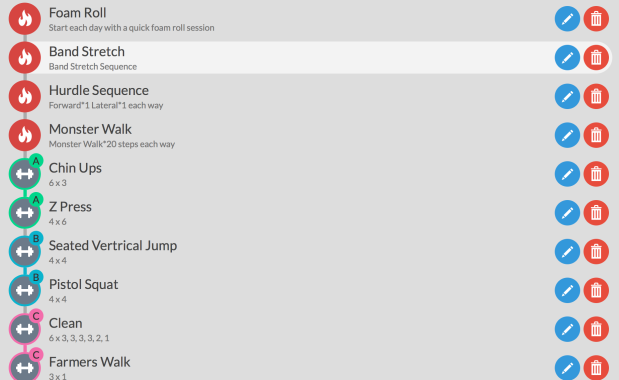
Below is an example of what a structured day SHOULD look like:

Screen Shot 2019-09-15 at 7.12.07 PM

All of our programs at Smith Performance are designed around a pull, push, squat, dynamic movement and carry every single training day. This allows for variety within the program while still providing a consistent stimulus for growth.  Coaches are wearing many hats and stressed thin as it is, not all districts have the budget to have a certified strength and conditioning coach overseeing the programs. Smith performance provides the ability for all schools to have a program designed by a Certified Strength and Conditioning Specialist.  We also offer individual programs and professional development for school districts across the United States teaching coaches how to oversee the weight room and design a proper program. The weight room is the most dangerous place on campus, make sure your athletes are safe and your coaches are educated with Smith Performance.

If you are looking for an online training program for your school or individually let me work for you to design the best program to fit your equipment and abilities.  All programs are CUSTOM made to your goals and strengths. I work to develop the total athlete, mobility, injury risk reduction, increased speed/power and strength. All programs are delivered directly to your phone through the Teambuildr app.  You can contact me by cell at 870-613-0075, on twitter at @coachdeesmith or via E-Mail at coachdeesmith1@gmail.com. Let me help maximize your teams yearly development.


Raising $ for Athletic Programs

We all know the fun parts of coaching.  The X’s and O’s, drills, game night, building relationships etc…. It is easy to forget that every athletic program in the world requires funding in order to operate.  nothing will crash a program quicker than a lack of funding.  We need to remember that your athletic program; be it football, basketball or any other sport is also a business.   That business is sales.  Period.  You have to sell the program to players, to parents, to the community, to the faculty, to the administrators and yes.  You must sell your program to those who would donate, invest and purchase products offered by your program.  If you are the head coach of a program, then you are also the CEO of your business. There is simply no way around this.

So knowing this, lets talk about the one thing coaches seem to dislike more than picture day…. FUNDRAISERS.  You cannot operate a program without them, so get that out of your head now.  Your attitude in the application of fundraisers will determine how much money your program can raise.  Treat it with the same passion as you have for drills and games and you will raise a lot more than if you treat it with disdain.  Its like anything else in life, you get out what you put in.

Even if we don’t outwardly acknowledge it, we understand its importance.  So lets focus on some ways to make $$$ for the program.  A really easy way what I call the Sponsorship Program, the link below will take you to a google form for you to down load and make your own:

SponsorshipProgram  exchange-money

The first part of the program works by selling advertising space.  Many programs do this.  You will sell banners to hang around the field as advertisements that companies can purchase.  Here is a very valuable selling point, if you have access to a fence that faces out tot he main road people drive on… then that is prime time real estate! It is a very high traffic area and a very easy sell.  There is a school in Brevard County FL that routinely raises over $15,000 a year just doing this!

The second part of the program is touchdown and first down sponsorship.  Vendors can choose to sponsor a First down.  For example, a sponsor that I used one time was Buffalo Wild Wings.   Every time we got a first down, the announcer would say “That’s another Buffalo Wild Wings FIRST DOWN!” and then during the time outs, the announcer would do a 10 second plug for the various specials they had going on.

The phone is your greatest tool for doing this, you will have to cold call business or if you are the personable type, walk in face to face to sell your program.  Get your staff to help with this too and use players as well once or twice a year to go out business to business (under supervision of course).  when offering the sponsorship program always offer a choice of a simple donation as well. You would be surprised at how many businesses are more than willing to donate a monetary amount to give back to the schools in their community. (If you would like a script to use for doing this, email me or DM me on twitter here @thecoachvogt)


Other options you have are using outside fundraising vendors to help you push a product.   Typically, I prefer to stay in house as I like to keep all profits made for the program… but that said.  There is one company comprised of former athletes and coaches that is a major exception.  They will raise more funds than any other vendor I’ve seen, and do it by a large margin.  Enter, ADRENALINE FUNDRAISING!

logo

They help guide you and your players in a step by step fundraising protocol that just works.  All you have to do is get on any social media platform and search ADRENALINE, and you will see countless programs raising over $25,000 dollars on a SINGLE FUNDRAISER! That is extremely impressive.  No matter how you slice it, that is a lump of cash that can do a whole lot of things for an athletic program.

shutterstock_165014246

They provide incentive for your players to produce,  such as: hoodies, shirts and compression attire.  They provide structure and demonstrate the “why” it is important to be a producer.  Take it from ADRENALINE rep, Scott McMaster:

“A couple things that we love to see is just how fundraising is relateable to life and the sport.  Men were built to be providers and for some men this is their first “practice” at providing.  The way we see fundraising is it’s all about effort and mentality.  Effort is on the kids and mentality is on the coaches.  The years kids put forth good effort in card sales those same kids put forth good effort on the field and vice versa.  We run a pretty consistent program and a lot of my coaches know how their season is going to go based off their players effort in the sale.  On the coaches side, the coaches that make this important crush it.  The coaches that get up there and say they hate fundraising usually don’t do well.

Do you want a company that’s in your corner? A company that’s compensated based on how much is raised so our reps are always thinking about how you can raise more money? We view it as being an additional member of your staff.  Similar to a D-line coach or a running backs coach.  We just do that for fundraising! We are YOUR Funding position coach!”   -Scott McMaster.

The best part about ADRENALINE… you and your players DO NOT have to handle cash.  It is all tracked digitally!  Offering products from Discount cards, tumblers and food to a simple donation app that can be sent via text or social media.  They really do make it easy.  A product list can be seen here: ADRENALINE PRODUCTS


CLOSING

Say what you want about any athletic program and how to successfully run one.  The underlying truth cannot be denied no matter how much one may try.  You are in a sales business, as a head coach you are the President and CEO.  You don’t every want to be on the other side of the table with administration when they start asking about funding issues.  There is one thing that will get a coach canned faster than losing or doing something knuckleheadish… and that’s MONEY.  Fortunately, if you understand that any athletic program is a also a business, you will always be fine!

Until Next time,

-Coach Vogt

A Philosophical Approach for Play Calling

If you have read my latest book “Calling Plays” you will already understand that it does not matter if you’re a Spread guy, a Wing guy, or an Air Raid guy. All play callers will benefit from calling plays using Wing-T principals.  That doesn’t mean you have to get in double wing X over… you can still use the same principles in four and five wide receiver sets.  Its about the philosophy, not the structure of the formation or type of plays you prefer to use.

Wing-T play callers start by using formations that force the defense to spread themselves thin in the middle or risk being outnumbered on the flanks.  That should sound very familiar to the coaches who base out of the spread.  Each formation and play call in the wing-T is designed to put a specific defender into a conflict.  You can also do this in ANY OTHER offense out there.  It is the philosophy that you will use.  The particular offense doesn’t really matter as long as you have the personnel to do the things you want to do.

You are going to be using an If/Then call philosophy.  If the defense does that, then I do this. It is very simple and makes calling plays instinctual.  Now to do this, you will have to go against one of the latest fads in offense.  That being the “Pre Snap Reads”. Don’t get me wrong, they definitely serve a purpose and have proven effective…. But I also believe that “actions speak louder than words”.   Pre snap, the defense can lie to you.  They bluff, and stem and roll and feint and do all kinds of dishonest bull crap pre snap.  After the snap however; they become a patron saint.  They have to tell the truth about what they are doing, or they will give up a big play.  So, that being said, most of the play call decisions you will make will be based on post snap ACTIONS of the defensive players. Also remember, you don’t have to outsmart the DC… you must outsmart the defensive players.

Using If/Then to guide your play calling will allow you to call plays much faster than normal because you will know exactly what to do based on the reaction of the defender that you were attacking on the previous play.  Each formation you use will show you the general idea of how the defense is going to play you, but post snap will tell you EXACTLY what they want to do.  Using this concept also gives the other offensive coaches a stake in the offense as each one can be in charge of watching a spot on the defense to let you know as the play caller where the ball should go next or in the near future.  For example; I always have a coach that oversees the watching the safeties.  As soon as the safety is stepping down hill on the snap instead of back pedaling, he lets me know and the very next play is a play action shot in the area he is supposed to be defending, but has forgotten because he is too concerned with fitting the run.

When using If/Then philosophy each play will target a specific area and the next play will be determined by how a specific defender reacts.  This is where the “Same As” plays come into play, that is, those plays that look like other plays used to place defenders in conflicts.  Examples would be Belly and Belly Option in the wing-T.  If the edge defender is squeezing the Belly, you call Belly Option and now that defender who thinks he is doing his job to stop the belly is getting pinned inside and the ball is outside.  A spread example would be matching the fast bubble with the bubble go or the wheel/sluggo combination.  Both look like bubble pass initially and if that safety is cheating on the bubble the play before, you have a good chance at big play.  This is also why having your entire offensive staff on duty helps.  Each guy will be watching for an If/Then call!  Dress up these “Same As” plays with some window dressing and they get even more effective. We will get into how to If/Then from each offense in their respective chapters later in the book.

Wing-T philosophy also works under the understanding that formations are a weapon.  Your formations need to serve a purpose.  It is my belief that what ever offense you run, your formations should be used to expose the flank of the defense and get more numbers outside than they have.  This can be done in spread or tight sets.  Being multiple with formations can cause confusion in the defense as well. We will cover the use of formations for each offense later on. For now, let’s get onto moving the football.

In all offenses, yes even the wing-T you must get the ball into grass.  One might logically think that spreading out accomplishes this with simple offensive structures… but that leads to a false sense of security.  Space is relative to the number of your blockers to their defenders.  If you line up in five wide and try to run the ball into six defenders you will quickly find that you don’t have that much grass to work with and your quarterback will be more testy than prom date dumped on the night of the dance. So how do we use wing-T principals to find the grass?

Believe it or not, in the passing game it is simpler to do this than the run game, we want to get the ball into the spots with open grass.  There are many ways to do this, but the two easiest will always be: spread the field and find the empty space or use formations that force DBs into run fits and pass the ball to the spot they were supposed to be occupying after a good play fake. Your passing attack should directly reflect what you are trying to do in your run game.  Meaning, if you are going to spread the field, you should be passing to open the run game, if your condensing the field it should be done so your run game will open up big downfield strikes.  The best teams can do both.

To find the grass in your run game, you will always need to adhere to these three simple rules:

  1. Place defenders in conflicts – As stated before, there are several ways to do this. Let’s review:
    1. Have plays that look like other plays. This is the easiest way and EVERY play in your play book should look like another play in your play book.
    2. Using formations that place defensive backs into run fits. Force the DBs to make tackles in the run game and it will open your pass game. (bubble pass counts as a run in my book)
    3. Reading defenders with options and RPO’s. If you got the QB with the wit to do this and make the correct read consistently you will cause the defense a lot of problems.  If he can’t do it with more than 75% correct read ratio… you are probably causing yourself more grief than you need to.
    4. Using motion and misdirection. Eye candy and window dressings take eyes away from what’s really going on.  Especially if the eye candy threatens an area that is supposed to be defended by that player.
  2. Use angles – There is no arguing here. If you give your blockers an angle to their block, they have a significantly higher chance of success.  As long as they can throw a basketball pick then then have a chance.  For example; call a play where the tackle just needs to wall off a three tech inside instead of reaching a loose five tech. Or a play where the tackle can just wall off that loose five tech.
  3. Attack the bubble – Every defensive front will have open spots on the line of scrimmage. That is the bubble.  Attack there, while giving your blockers angles and you should at least get three to four yards before your ball carrier is touched.

The more of these rules you can incorporate the better the call is.  Always aim to have at least have two covered every play call.  Try for all three whenever possible!  If you only have one, the chances for success decrease.  If the call does not use any of the three rules, then most likely you will experience a failure on the play and end up behind the chains. You want to avoid losing yards in the run game AT ALL COSTS.

You also have one more rule you must live by… NEVER RUN INTO MORE NUMBERS THAN YOU HAVE BLOCKERS!  If you have three to one side and they have four, the three rules of the run make no difference.  Even if you are going to option a defender, do it to where the numbers are at least even, so you end up having plus one in the blocking scheme.

Let’s review this section and the philosophies we are going to focus on for play calling: Use If/Then principals. Use formations as a weapon. Find the open space in the passing game and use the two rules to get there.  Use the three rules for the run game. NEVER run into more numbers than you got. Focus on outsmarting the opponents players, not their DC. (that doesn’t mean you shouldn’t scout him up and know what he likes to do when… just that you need to remember, he isn’t the one strapping up.)

Preparing for Your Head Coach Interview! P.1 – The Resume & Letter of Intent

You wake up in the mornings and you have the “itch”.   You know what it means.  You have been thinking about it for a long time.  Most of think about it for years before we the “itch”.   You’ve put in your time.  You have been an assistant, a coordinator and have experienced success.  You know how important building relationships in a program is, and you may not be 100% “ready” (you never will be btw), but you have now decided that it is time to take the next step!  You are going to start applying for Head Football Coach positions at the end of the season.   Congratulations!  This is a big career step and just putting yourself out there for consideration is a big move.

If you are going to do this you need to understand you will have to apply at a A LOT of schools.  Like many jobs, you will have to deal the “good ol boys” that have connections getting slipped into spots.  Most of the “good” jobs have the coach they want in mind before they let the current coach go.  Some schools wont even take applications, they will reach out to the coaches they want.   But don not be discouraged!  That will be you one day!  But for now, you will have to play the numbers game.  Remember, your new, and even if you are not, somebody out there will always be better on paper than you somewhere.  That’s just the name of the game.  What you need to do is:

  • apply at several spots, the more interviews you get the better
  • be aware that you DON’T have to take a job if they offer
    • the right job is better than A job
  • develop a plan of attack

This is going to be a three part series dedicated to the process of attaining the position of Head Football Coach:

  1. The Resume and Letter of Intent
  2. The Portfolio and Interview
  3. The Follow up and the Finalist Interviews

THE RESUME

What it Should Not Be

It is always easier to start with what to avoid with things like this.  Your resume should NOT do the following things:

  • Be a comprehensive life/career documentary
  • just a list of places that you have worked
  • be more than two pages long
  • be flashy and colorful
    • this is hard to read and if information is hard to read it gets thrown out
  • have a lengthy objective
  • list your athletic accomplishments as a player other than where you played
    • no one cares you made 12 tackles in a championship game except you

What it Should Be

The first thing you must remember is the people selecting candidates for interviews are reading a whole lot of material from many different coaches wanting that spot.  Sometimes they get hundreds of applicants that they must go through.  If your resume is too flashy or hard to read it gets thrown out.  If it is too long… they wont read past the first page or too anyways. Here is what it should be

  • Simple, Clear and Easy to read
  • use bullet points
  • ideally only one page long, two pages at maximum
  • clearly show how you IMPROVED the team from when you arrived to the current point in time
    • EX:  -Improved points per game from 17.5 to 28
    • Ex: -Decreased academically ineligible players from 7 to 0 in one semester
  • Structured just like this from top to bottom:
    • easy to read name, email, phone number with a bold line separating this from the body of the resume
    • objective that says exactly this:
      • To Obtain the Position of Head Football Coach at _________ High School
        • NOTHING MORE
    • education, only list the following
      • where you went to school, what your degree is in, when you graduated
        • NOTHING MORE
    • Summary – this is just list of bullet pointed “Proven” abilities
      • Ex: -Effectively increasing student-athlete academic performance via…. yada yada, (you get it I hope)
    • Coaching Experience
      • each TITLE gets a section, NOT each job
        • head coach, OC, DC, position coach, etc…
    • Teaching Experience
      • one section, brief, that shows how you improved students, you don’t need to list every school you taught at
        • remember, this is an interview for Head Coach, the teaching part will come AFTER they decide they like you
        • my coaching resume and teaching resume are two separate documents
    • Certifications
      • just a list of what your certified to teach, they only care about where they could put you if hired

THE LETTER of INTENT

Often call the “cover letter”  the letter of intent declares that you are intending to obtain the open position at their school.   Again, lets start off with what it shouldn’t be.

What It Shouldn’t Be

  • a declaration of your life accomplishments
  • dedication to your family
    • look, nobody is saying you shouldn’t be proud of your family, but when you put it in your LOI, it distracts from your purpose
  • like your resume, it should not be a list of every career stop you ever made
  • sent as an attachment
    • send it as the body of your email and save the resume, portfolio and references for the attachments
  • too long
    • it needs to use the “miniskirt” rule
      • long enough to cover the important parts, but short enough to keep their interest

What it Should Be

As stated earlier, you must remember that the selection committee is getting hundreds of emails.  Yours needs to stand out, so your letter of intent will be the body of the email. The subject of your email will be “Head Coach Position”.  Your LOI should”

  • be like your resume and clearly show how you IMPROVED the team from point when you arrived to the current point in time
    • in your LOI these statements are more of general whole because it will be written in proper format instead of bullet points
  • should clearly state your interest in said school and why
  • should be structured like this
    • introduction
    • what you bring to the table
    • proof of what you bring to the table (bullet 1)
    • restatement of what you bring to the table
    • closing statements
  • the structure should flow and be easy to read
  • make sure you state the beliefs you have on education and the impact you can have on it with football being the driving tool

CLOSING

I hope this is a nice little guide for anybody wishing to start the process of preparing for a head coach position!  Stay tuned for parts 2 and 3 which will all come before the end of August!

If you are looking for a jump start, I do offer a HC Interview Package for purchase.  It is 11 total documents, Ill send it in an emailed zip file. Then we can schedule a phone call and I will teach you how to use it and what to do with it before an interview. How to use it in an interview to keep the panel on your plan, not theirs. The portfolio itself is 35 page portfolio that I built over the past 6 years. It outlines your plan as a head coach and covers Mission Statement to fundraising plans. Lifting plans. Philosophy for O/D and ST. Academics. Discipline policy. Every possible question an interview panel could ask is covered. It makes you look extremely organized and you can anticipate questions coming before they are asked. Ability for full customization to you.

The package includes:

  • Portfolio
  • Sample Resume
  • Sample Letter of Intent
  • Entry Plan
  • Off Season Plan for Success
  • Academic Eligibility Tracker
  • and more

DM me on Twitter or Email me for more information

PRACTICAL FITNESS

INTRODUCTION

They say if you have your health, you can handle anything.  For the most part that is a true statement.  This guide is going to be about staying fit and being healthy for yourself, and for your family.  I’m not here to tell you how to be on the cover of a muscle and fitness magazine, or win the next gold medal in the clean and jerk, but to provide a guide on how to establish and then maintain healthy level of strength, fitness and body weight.

Let’s face it, it can be a trying ordeal to accomplish this as a busy professional.  Long hours, sporadic meals, of which many are of questionable decision making for the sake of convenience.  On top of that, you have a family as well. How can you justify taking even more time from them?  It is my belief that you owe it to your family to take care of yourself. Self care is self preservation, you can only take care of someone else when you are able to take care of yourself as well. You should be able to play in the back yard with the kids and not get winded.  Or to have the general strength to take on work around the yard and house.  This book will walk you through several easy to understand plans for diet, programming, and time management.  Choose the plan that best fits your desires, goals and schedule and combined with intelligent food choices, you will avoid the dreaded “dad bod” look.  (make sure read the diet section)

Dad Bod- the gradual accumulation of weight around the mid section as a result of high stress, low amounts of sleep and poor diet choices to make up for lack of time.  Women are subjective to this condition as well, it will typically manifest around the hips, and under the arms for women.

For a lot of people, it is not to hard to remember when we were younger and in much better shape.  Be that from general effects of youth, or maybe you played sports in high school or college.  Think about how you looked when you first finished playing sports, or when you lived a more active lifestyle as a younger person. Think about the things you could do.  While returning to the level you were at back then, or while you were playing a sport is not likely, we can get in pretty good shape!  For some us, we may get into better shape than we have ever been in our lives!  IT IS NEVER TOO LATE TO GET IN SHAPE!

An easy to implement and effective fitness program.

Being a Head Strength and Condition coach for many years, it would be safe to assume that I place a huge importance on strength development, as should all of us.  I feel it makes the difference between good bodies and great bodies. Now, just because you are strong, does that mean you will have a great body? No, of course not.  But, if you have somebody with a good looking body stand next to somebody with a great look body, I can tell that nine times out of ten, the one with the denser muscles will be much stronger.

I am not writing this guide to make you into the next Mr/Mrs Olympia or win the next CrossFit Games, I am however, writing this to give you a realistic, simple and very effective way to develop all around strength and fitness, without having to break out physics calculators and go percentage crazy. A simple system that is effective, easy to implement, easy to track, easy to hold yourself accountable and most important, able to do while still holding a job!

THE BARBELL IS KING

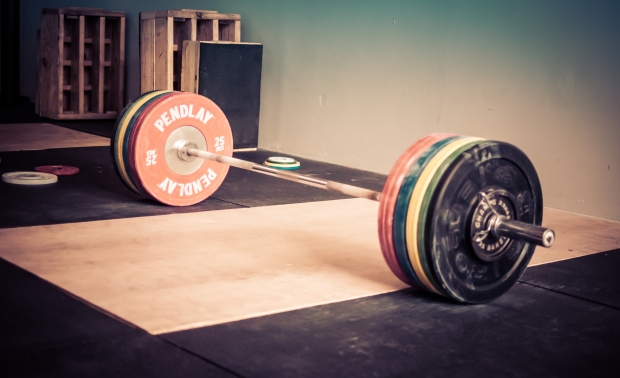
For the bulk of these programs, you will be focusing on use of the barbell. Dumbbells are great, bands serve purposes, machines are fancy looking.  The meat of any program needs to be moving a loaded barbell.  There is simply NO WAY AROUND THIS.  If you want to effectively make changes in your health, fitness, strength, and physical appearance, you MUST major in barbell movements. The loaded barbell has NO equal in developing strength and fitness.

PROGRESSIVE OVERLOAD

What every program you decide to use, you must have progressive overload.  The weight needs to get heavier overtime.  The slower you do this the longer you can keep it going.  Sub maximal lifting will increase maximal strength by progressively increasing weight and using proper set/rep schemes to utilize time under tension for placing proper stress on the body.  The stress stimulates response in form of thicker tendons and muscles which in turn increases maximal strength. Without getting all technical about it, here is what that means.  You will either add more weight to the bar, or you will add more reps to the sets in order to illicit change.

We Will Cover the Following Topics:

  • The Get Strong Program
  • 5×5 for a Tight Schedule
  • Balanced Life and Body Program
  • Metabolic Conditioning
  • Diet and Meal Planning

PROGRAM 1: THE GET STRONG PROGRAM!

The purpose of this program is maximal strength development.  It is the program that will take the most time in the gym.  It should be done three days per week with at least one day of rest between each day. For example: Monday Lift, Tuesday Off, Wednesday Lift, Thursday Off, Friday Lift, Weekend Off.  If you are a professional that travels a lot, reducing it to just two days a week will still work, but obviously will not give you the max benefits of the program.

SETS & REPS

For effective hypertrophy, you need between 20-30 total reps.  For strength most studies agree with 1-5 reps per set.  In this program the bulk is done with 5 sets of 5 at a set weight.  This gives us 25 total reps, and 5 reps per set.  I have experimented with 8 sets of 3 and 5 sets of 3 and 3 sets of 5.  But the most bang for your buck and time spent in my experience use the tried and true 5×5 rep scheme, or the ramping rest pause method. (will be covered later!)

PROGRESSION

If you are new to lifting, you will start with just the bar!  You are not allowed to use a loaded bar until you have mastered the 3 big movements (yes just 3).  Once mastered you can increase weights with big plates only. So from the bar it will go 25’s, then 25’s are replaced with 35’s, then 35’s replaced with 45’s, then once you reach the weight of 135 pounds, you will increase in multiples of 10.  So 145, 155, 165 etc.…  The weights are only increased when all sets of 5 have been completed, so if your goes 5,5,5,3,2 you stay the same.  If the lift goes 5,5,5,5,4 you stays the same. Only when the lift has attained 5×5, can you move up to the next load.

THE BIG 3

You will only track strength development in the Big 3.  The Push Press, the Squat, and the Dead Lift.  That is the meat of this program.  I can already see the furrowed brows out there from those reading this and thinking, where the hell is arm curls and bench press… but hear me out before you pass judgment. (bench shows up later I promise lol)

Push Press-the push press is an awesome FULL body movement.  You start in the rack position and dip the knees, high the hips slightly and extend locking the elbows at the top.  DO NOT drop under the bar.  Drive the bar up push the head through the arms to lock it out before returning the bar.  I prefer Push Press to bench because it is an explosive movement, and you do it standing up, which requires more nervous system involvement.

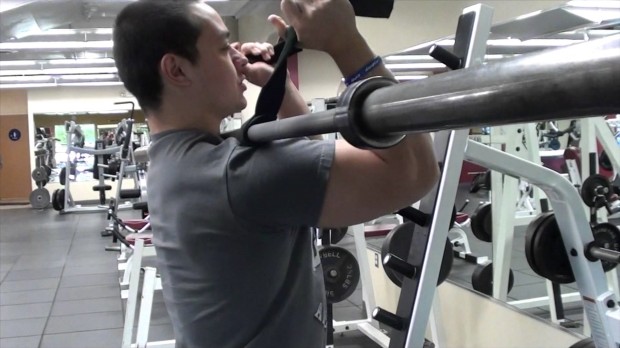
Front Squat– we choose front squat because almost everybody can front squat correctly. It is a more natural and athletic movement than the back squat. It is very natural for the lifter to be able to sit below parallel (yes squat below parallel).  The lifter remains upright and in an athletic position. You will still use back squats which I’ll cover later but they are not the in the Big 3 for this particular program.  When self-coaching the front squat the simple cue of “elbows up” seams to take care of 90% of form issues.  When front squatting always use the front rack position, NOT the arms crossed position!  This rotates the AC joint forward and the bar will roll forward instead of sitting back on the front deltoid/pectoral shelf created by the rack position.

GOOD                                                          BAD

If you have an issue with bad wrist mobility, this is the accommodation that you should use. This allows the lifter to maintain the “elbows up” position.
lift5

Dead Lift-the dead lift is the king of maximum strength development.  The entire posterior chain is activated during the dead lift as well as the trapezius, biceps and quadriceps. Strengthening the hinge movement is crucial to functional strength, you use the hinge when stand up, lift things off the floor, run, jump, walk, play with the kids… basically for any daily movement. When dead lifting cue yourself with “eyes up” before you grab the bar. (don’t look at the ceiling, but don’t look at your toes/bar either) You are not allowed to look at the bar when grabbing it or lifting the weight.  This forces a low hip high chest position that we want.  You will use a double overhand grip on the dead lift to limit weight and promote balance.  Once you can dead lift 300 pounds for a set of 5…then you can start using a cross grip.  You will focus on perfect technique and bar speed over weight, bar speed trumps maximal weight here, save that for when you choose to do max outs and test your strength.

Back Squat-while the dead lift is king of strength. The back squat is king of mass accumulation.  You will use back squats for high reps once a week at the end of the work out and I’ll show where and how it fits accordingly.

THE PROGRAM

Pre Workout-do whatever normal warm up you like.  I prefer short and sweet, get moving > static stretches. Such as high knees, A-Skips, but to each his own.   After the general warm up I insist on a set of 5 of broad jumps or vertical jumps to do a pre lift explosive primer. Get the fast twitch muscles activated.  Once in the weight room, do 2 sets of 5-10 pull ups and dips.  Not looking to wear yourself out.  Just get the blood moving and your body prepared for the strain of lifting. If you’re a big body, sub with rows/pull downs and push ups but I encourage you to try daily to do pull ups and dips, eventually you will be able to complete some.

Then you start the main lifts:

Push Press 5×5

Front Squat 5×5

Dead Lift 5×5

Remember, only increase load once all reps are attained.

The days you will lift are Monday, Wednesday and Friday, or Saturday, Monday, Wednesday.  After the big 3 on Day one, go outside for loaded carries, med ball throws and some core work.  Mix it up, have fun with it, no need to go crazy, especially if on a time crunch.  After the big 3 on Day Two, do open weights for 15-20 minutes. Do whatever lift you want, bench, curls, calves… it is entirely up to you.  After the big three on Day Three, you have widow makers!  You get in the rack and do high rep back squats. you are going for 30 total reps. Start with just the bar just like the other lifts and progress the same way! Once you can get 30 reps in two sets or less, you can increase the load as prescribed.  These will really gas you out, and you will feel lots of rubbery legs the first few weeks.  This will also drive your appetite through the roof, which is good for muscle gain… but do not over do it.

SUMMARY

This entire lift should take no more than 60-70 minutes to complete.  If it’s longer than that your wasting time somewhere. You want be on the move, in and out!  It’s simple, it has only 3 lift days but 75 total weekly reps.  Plenty of time left to focus on the rest of your life. When you get to a point where you are not advancing any more on five sets of five, switch to three sets of five so you can keep adding weight. Also,  feel free to sub back squats for front squats if  you must.

PROGRAM 2: 5×5 FOR A TIGHT SCHEDULE

You have two types of programs that are most likely the best bang for your buck! 5×5 will never be a bad choice for both strength and hypertrophy.  Multiple sets give you volume needed for hypertrophy and 5 reps per set allow for heavy weight to be used.  It’s arguably, the best of both worlds.  You get adequate load used, as well as adequate time under tension (how long the weight is being lifted for.)  What are the draw backs? For a busy person with a job, especially if it’s a job that requires travel, or long hours like coaching, or outside sales, 5×5 can simply take too much time.  Throw having kids into the mix and it can be downright impossible to spend that much time in the gym, even if it is only two or three days per week.  So, how do we mitigate the time constraints of being an adult, and still be responsible for our own health and well being?  That is the question that I am going to answer for you in this program!

This program will divide your work outs into two different, three day rotations with one day off between rotations.  Example schedule will look like this: Monday, Tuesday, Wednesday, off. Friday, Saturday, Sunday, off. Tuesday, Wednesday, Thursday, off, and so forth.

Each workday should take no more than 30 minutes.  If it takes any longer than that, as I have said before, your doing it wrong.  Time between sets should be no more than 2 minutes; but try for 90 seconds or less if you can.   Each day is going to focus on just ONE main lift, and ONE supplemental lift that will be incorporated into your conditioning circuit after the main lift is done.

THE BIG LIFTS AND STARTING WEIGHTS

You will have 6 BIG LIFTS to focus on for this work out program.

Rotation One Lifts are: Push Press, Front Squat and Dead Lift.  The coinciding supplemental lifts are Pull ups, Sit Ups and Barbell Curls.

Rotation Two lifts are: Bench Press or Weighted Dip, Back Squat and Power Cleans.  The supplemental lifts for rotation two are: Barbell Rows, a Plank Variant and Chin Ups.

For each of the Big Lifts you will choose one of the following starting weights: 45, 95, 115, 135, 185, 225, 275, 315, 365, 385, 405.  Always choose lighter than you think you will need to begin this program.  So, if you are pretty certain you could get 5 sets of 5 at 225 pounds, you should start at 185 pounds to give you room for steady progression

SETS AND REPS

As the title of the program fore tells, you will be doing 5 sets of 5 reps.  You will keep the same weight across all sets. On your last set you will try for as many reps as possible while maintaining good form.  Some days you will feel great and get 6-10 reps, other days you will struggle to get 5 and that’s OK.  If you get ALL 5 reps on ALL 5 sets then you will increase the weight by 10 pounds.  If you miss just one single rep, you will keep the same weight and try again on the next rotation.

SUPPLEMENTAL LIFTS AND CONDITIONING

To save time you will combine your supplemental lifts with conditioning into a circuit consisting of 3 to 10 rounds or in an “as many rounds as possible” in 10 to 15 minute time windows.  These circuits are NOT cardio, they are metabolic conditioning. Your supplemental lifts should aim for 30-50 total reps by the end of the circuit. There are several ways to go about doing this.  One, you can pick one of the MetCons I provide in the section called Metabolic Condtioning. Or another easy way is to look at something like CrossFit’s website for the WOD and just add your supplemental lift to the WOD or replace an exercise with yours.  I like to get creative.  Here is an example for Push Press day:

10 rounds of: 5 pull ups, 10 kettlebell swings, 10 kettlebell thrusters.  Personally I like to make my conditioning circuit a full body circuit. So, even though my main lift will be either upper, leg, or hip focused, the MetCon can hit the entire body.  This is good for strength, fat burn and overall muscular development.

SUMMARY

This workout takes one of the most effective workout programs ever developed and makes it applicable to the everyday working professional.  Everybody can take 30 minutes or less for a workout.  If you have to miss a day because of responsibilities, its no big deal.  The scheduling of the program allows you to simply pick up where ever you left off.  Give this program a try for three months, if you can do that consistently paired with good diet and good sleeping habits you will get stronger and in better condition.

PROGRAM 3: THE BALANCED LIFE AND BODY PROGRAM

We are adults, we work all day then sometimes go work or travel for 2 to 3 more hours before coming home.  During the weekends we often have second jobs or if we are home, we usually are still doing some work at some point.  This is not going to make you set any records or grace the cover of muscle and fitness…well if it does make sure you credit me!  All joking aside, This program is designed to get you stronger and make you look like you could still play a sport if you had too, and hopefully, make you feel confident in swim attire.  The whole thing will take between 15 and 30 minutes, and it is 5 to 6 days a week depending on the rotation and how you are feeling recovery wise.

This is my personally preferred workout program.  It uses an overload method called the “Ramping Rest Pause”. Working out more days for shorter amounts of time is the best way to go.  It develops habits, and you are in and out of the weight room, vs the other method of three to four days a week and in the weight room for an hour, sometimes more.  You will have a warm up, a strength lift, a supplemental lift, a MetCon and then you are done. MetCon stands for metabolic conditioning.  It was established by the Russian weightlifting team in the 1940s. Today, hipsters like to call it crossfit (Don’t worry, we won’t be doing any flying monkey snatches).  It is short, it is intense, it gets the heart rate up, which is what we want. (see Metcon Section)

Warming up is easy, you can do old school calisthenics, a quick jog or my favorite, jump rope.  I highly recommend jumping rope, it is a great whole body warm up, primes the central nervous system and only needs to be done for 1 to 3 minutes.  It is also a good test to determine how the day is going to go.  If you blast through the jump rope you can probably really get after the weights.  Stumble and smack your shins and your back a lot…you probably should take it easier as your nervous system may need a break.

After you warm up you will do as many pull ups as you can, take ten deep breaths, and do as many as you can again.  Once done with this, you will move onto the main lift.

The program goes 3 days on, and 1 day rest/off

Day One

Squat Move (back squat, front squat, split squat) you pick.  I would pick one lift to focus on and then rotate them every 3-6 months if you are getting bored.

Squat Move (Lunges, Front Squat, anything that targets the legs or gluteals)

MetCon

Day Two

Hinge Move (dead lift, Cleans)

Hinge Move (Clean variant, Snatch Variant, kettlebell swings, jumping, RDL)

MetCon

Day Three

Push Move (Push press, bench, dips, strict overhead press)

Push Move (close grip bench, push ups, dips, tricep extensions)

MetCon

Rest day, then repeat Day one

You will only track the last set of each main lift.  The first one to four sets will be ramping sets of FIVE reps that progressively get heavier till you get to your work set.  These sets warm you up for the last set. Then for that weight you will try to get as MANY as POSSIBLE.  Once you can get between eight and ten, you know that the next time that you do that lift, you can move up five to ten pounds.  After the work set no matter how many you get, take ten to twenty deep breaths and do it again, you may only get one or two reps but that is OK.  The idea is that you did it again while the body was still taxed.  This is called a “Rest Pause”.  You get back under the bar while you are still slightly fatigued and rep out a few more!  This is great way to provide stress on the muscular system and it elicits growth and hormonal response.  An example ramp might look like this,

Back squat-45×5, 135×5, 225×5 and 275×7, 20 breaths then 3 more reps.

MetCons are simple, get moving fast with inefficient movements to increase the heart rate.  Combining two to three movements seams to work best.  One of my favorites is combining jump rope with push ups.  Jump rope for 30 seconds as fast as possible then do 20 push ups and go back and forth for 10-15 minutes.  No MetCon should take longer than TWENTY minutes.  Always cut it off at 20 minutes, ten to fifteen minutes is usually what I go for.  Another combo is burpees and sit ups. or jogging and jumping jacks. The good thing about a MetCon is, it can be different every day.  Several MetCon examples are given in the Section titled “Metabolic Conditioning”.  Pick from one of these each day and you will never go wrong.  Simply pick one of the MetCons that has a supplemental lift from your list and go! (It is OK if you double up movements day to day)

If all that is too much to think about, and you just want to be told what to do.  Here is what I do personally and have experienced lasting success!

Day One: jump rope three minutes, pull up rest pause, back squat rest pause, metcon with a leg movement in it, abs or curls if I have time left over.

Day Two: jump rope three minutes, pull up rest pause, dead lift rest pause, metcon with a hinge movement in it, abs or curls if I have time left over.

Day Three: jump rope three minutes, pull up rest pause, over head press rest pause, metcon with a press movement in it, abs or curls if I have time left over.

TIME MANAGEMENT 

This whole work out should take no more than 30 minutes, 20 should be an attainable average.  But you are working out five to six days per week to make up for the short time.  You can fit twenty minutes a day anywhere.  Wake up early to get to a gym.  If you are like me and have stuff in your garage, do it there in early morning, or after the kids go to bed.  Maybe you’re a teacher or coach at a school, use the school weight room, get in early.  Do it on your plan period, its only 30 minutes of working out.

Do it on your lunch break.  Do it right after work before you get home, stop by that gym on the way, but once your home let that be family time.  Either start your day with the workout while the family is asleep, or do it before you get home at some point.  You should let home time, be home time.  You can also use family time as a way to get extra general movement in.  Play with the kids outside, or go for a family walk, walk the dog.  We live right by a wild life preserve called Turkey Creek, I love to take my son there and walk the trails.  Its bonding time and some extra movement to help maintain a healthy life style.

SUMMARY

This should be more than enough to get you started and maintained for a long time.  Finding time to keep ourselves healthy is a priority if we want to be there for our family and set a good example for our children to be healthy as well.  If you ever get to a point where you are stalling out on a lift and not seeing progress, simply change the main lift and keep going from there.  This program is probably the all around best one to use for those of us that have limited time to spend working out.

METABOLIC CONDITIONING

Metabolic Conditioning  or MetCon for short, has been recently popularized by the “CrossFit Crowd”.   In reality, it was first used during Soviet era Russia by its Olympic Athletes as  a way  to condition them, build strength and develop work capacity in the most time efficient manner.  What they discovered  was what would  become one of the, if not the most effective conditioning tool in the exercise world.

So, what  is our goal when using  Metabolic Conditioning?  We can get technical and talk metabolic pathways… but that kind of defeats the purpose of this manual.  So, in laymen terms, the goal of metabolic conditioning for these programs  is to accomplish a few things. One, to increase your ability  to complete work in a given time period, something called “work capacity”.  Two, to  elicit fat burn by rapidly depleting muscle glycogen and creatine levels while simultaneously increasing heart rate.  This causes spikes in growth hormone and “EPOC” (excessive post-exercise oxygen consumption).   Finally, to build muscle.  The reps done during the MetCon will add overall volume to your resistance training by adding reps.   The “Complexes” are especially effective at this.  All this should be done in the ideal window of ten to fifteen minutes. For this manual we will focus on  three types of MetCons.   TABATA, AMRAP and Complexes.

TABATA

Tabata is a form of high intensity exercise invented by Dr. Izumi Tabata.  It consists of four minutes of work, that’s right, just four minutes.  But don’t let that  fool you! It can be extremely intense depending on the exercise you choose to use with it.  Here is how it works, you will exercise for twenty seconds as hard as you can, and then rest for ten seconds. You will repeat this eight times for your four minute total. When doing tabata as your MetCon you should do two, four minute rounds with different exercises and one to two minutes of rest between rounds.  This gives you eight minutes of work and up to two minutes of rest for a MetCon that lasts ten minutes.  Which is in our ideal, ten to fifteen minute window. When choosing exercises for tabata, as a general rule, movements that incorporate a lot of body movement are best.  If  you are going to use weights for tabata, always choose a weight lighter than you think you can do for the sake of  staying in good technique and remaining safe.  Here is a list of exercises that are great for tabata:

Burpees

Burpee Pull Ups (do a  burpee, then jump up and do a pull up)

Jumps of all  kinds

Kettlebell/Dumbbell Swings

Kettlebell/Dumbbell High Pulls

Dumbbell Clean and Presses

Jump Rope

Double Unders (jump rope where the rope pass two times per jump)

Lunges

Running

You can choose other exercises to use if you wish, but in general, exercises that involve a lot of body movement will give you the most bang for your time!

AMRAP

AMRAP is an acronym for “As Many Rounds As Possible” or “As Many Reps As Possible” in a given time period.  Remember, we want that ten to fifteen minute time window.  You will choose between one to three exercises for the AMRRAP, a time window, and then complete as many rounds/reps as you possibly can within that window.  Do not aim to pace yourself for these.  It is better to stop and catch your breath, than it is go at a slower pace.  It is that rapid increase in heart rate that we are going for.  As time goes on, you will find that you can go harder for longer (that’s what she said).  Here are some great examples of AMRAPs  that you can use for your MetCons:

Burpees

Double Unders

10 Kettlebell High Pulls, 10 Kettlebell Swings, 10 Sit Ups

50 Rope Jumps, 10 Push Ups

2 Pull Ups, 5 Push Ups, 10 Bodyweight Squats

10 Lunges (each leg), 20 Mountain Climber

2 Clean and Press, 10 Burpees

50 meter Farmer Walk, 20 Push Ups, 20 Crunches

50 meter Sprint, 25 Push Ups

8 Bench Press, 8 Burpees

5 Box Jumps, 5 Lunges, 5 Push  Press

COMPLEXES

As far as MetCons go, it is hard to beat the Barbell Complex.  They can be downright brutal in difficulty, but they are extremely effective.  If ever in doubt about what to do for a MetCon, choose a complex. They have the unique ability to build muscle and burn fat.  To produce strength gains, and improve work capacity. Complexes are a gift from the fitness gods to athletes and average Joes alike.

When doing complexes you have one major rule.  DO NOT let go of the bar until the round is complete.  For ALL complexes, you will choose from one of the following weights to put on the bar.  45 (the bar alone), 75 pounds, 95  pounds, 115 pounds, 135 pounds, 155 pounds, 185 pounds, or 225 pounds.  To speak frankly, if you can complete these with 225 pounds or more…. Then you’re a frickin animal!  Remember, once you start the round, you will NOT let go of the bar until that round is complete. Also remember to work as hard as possible for  ten to fifteen minutes, NO MORE.  Here are the Barbell Complexes that you can choose from:

Chicken Little- 3 Power Cleans, 3 Jerks, done for 3 rotations per round.

Chicken Kickers- 3 Clean and Press, 5 Front Squat, 8 RDLs for 5 rounds.

Buck Bucks- 2 Power Cleans, 2 Front Squats, done for 5 rotations per round.

Buck Bucks Lite- 2 Power Cleans, 2 Front Squats, done for 3 rotations per round.

Clean Up- 3 Cleans from floor, 2 Hang Cleans from knee, 1 Hang Clean from thigh

Man Maker-8 RDL, 8 Rows, 8 Push  Press, 8  Back Squats, done for 3 to 5 rounds.

To and Fro- 5 Deadlifts, 10 Push ups Holding bar, done for 5 rotations per round.

Redskins- 5 Cleans, 5 Push Press, 5 Back Squats, done for 8 rounds.

Snatch To It- 5 Snatch Jerks (behind head), 5 Snatches, 5 Snatch Pulls, done for 8 rounds.

FHF- Front Squat to Overhead Press, Pull Ups, Sit ups.  Done for 4 rounds of the following reps: 20, 15, 10, 5.

Pull n Swing- 20, 19, 18…. All the way to 1 of:  Kettlebell High Pulls and Swings.

Remember when doing these complexes  to go has hard as you can and rest as needed.  If you hit that fifteen minute time limit, then stop where you are, even if you are not done.  You will have good and bad days, all that matters is improvement over time!

DIET AND MEAL PLANNING

I am definitely no expert in nutrition, but I can tell you this.  We are adults, and we know how to eat healthy and make adult decisions.  I get it, and I’m guilty too from time to time.  Those convince stops for food save time.  We all know that stopping for fast food after work, and/or kids practices/games is not the best choice, and it usually becomes a habit.  A habit that can lead to pounds stacking up each year.  Add a few years together and you start to go buy bigger pants.  Its not just after work either.  Starting your day with cereal that comes out of a box with a cartoon character on it should not be on your things to do. All the exercise plans in the world cannot overcome shitty eating.  That may sound harsh, but it’s the truth, and that being said, let’s take a look at some food choices.

Here is a list of foods to avoid:

SODA (by all means, even diet…stay away!)

Wheat (any carbohydrate that comes from a box or bag. Ex: sugar, cereal, bread, bagels…you get it)

Corn (its bad, no it’s not a vegetable)

The problem with corn and wheat is that its literally in everything!  So as a general rule, buy food from the outside perimeter of the grocery store.

Dairy (ok in small amounts)

Pork (yes its awesomely delicious, save it for special occasions)

Beans and rice (highly estrogenic, estrogen = boobs)

Here is a list of foods to eat:

WATER (the best anabolic hands down)

Vegetables (all kinds, all colors.  Eat lots. Mom was right all along)

Fruit (the more fibrous the better)

Things that used to have a face (chicken, beef, fish and so on)

Eggs

Potatoes (white, sweet, red… all OK.  Just keep them on workout days)

Nuts

MEAL PLANNING

Planning your meals makes eating healthier very easy.  Its really not that hard to do.  Tupperware on amazon is like five bucks for five containers.  Cook three to five lunches for work and stick them in the fridge.  Eat eggs and other meat along with fruit and or vegetables in the morning.  For dinner have one of the pre-made meals or cook something that is on the good list I provided.

What to cook with:

When cooking your meals, what you cook with, is important as well.  As a general rule, use and avoid the following items.

Avoid

  • Vegetable oil
  • Canola oil
  • Heavy Dressings

Use

  • Coconut Oil
  • Extra Virgin Olive Oil
  • Balsamic Vinaigrettes
  • Liquid Aminos
  • Real Butter (yes its OK, just don’t go crazy)

What To Cook

In general for every meal you at least want 1 protein source and vegetables.  Try to save carbs for after workouts only if you’re trying to lose weight.  If not, then be light to moderate with carbs and heavier after working out. With vegetables, in most cases raw is better, so you’ll only have to worry about cooking proteins and carbs.  There are lots of sources out there that will tell you eat so much protein per this and that, it can drive you nuts trying to count all that nonsense.  Just eat a lot of protein, and eat lots of vegetables… nobody ever went wrong there.  If you feel like you’re staying too sore for too long after working out, then eat more protein, drink more water and sleep more.  99% of the time, that will fix it.

How to Cook It All

I would only recommend cooking 3 days in advance.  So on Sunday cook for Monday through Wednesday.  Then Wednesday cook for Thursday through Saturday.  This way you won’t get fed up (no pun intended) with the same meals over and over, and it reduces the chance of food getting wasted by going bad.  For how to cook the food I recommend ways that allow you to cook the most amount of food with minimal amount of time and/or thought.  Here are some easy suggestions

  • Crock Pots
    • A very easy and delicious way to cook a lot of food. The bigger the crock pot the better.  Put in your protein source, your vegetables, and your carb source (if desired…I like potatoes lol) and then fill 2/3 the way with water.  If your doing a pork roast a recipe my wife swears by is as follows:
    • 3 lb to 4lb pork butt
    • 1/2 cup soy sauce,
    • 1 tbsp minced garlic
    • 2 tsp honey
    • 1/3 cup balsamic vinaigrette
    • 1 bag of baby carrots
    • Cup of chopped celery
    • 4-6 medium red potatoes cut in quarters
    • Set it on low Sunday morning and then Sunday night evenly distribute it into Tupperware.  (if you can manage not to eat it right then) allow to cook on low for 8-10 hours or on high for 5-7
  • Grill
    • Fire up the grill, if your grilling on weekends anyways, what better time to throw some extra food on for your weekly meals? Grilling is very versatile and can cook every food item you want.  When you are done, again evenly distribute the food into your weekly meal containers The foods I recommend cooking on the grill are turkey burgers, chicken breast, or a beef. You can easily do vegetables as well. The ones I have found I enjoy on the grill the most are zucchini, summer squash, bell peppers, and even asparagus just watch closely as it does tend to wilt if the temperature is too high so if you have a double rack grill use the top rack for your veggies.
  • Oven
    • A couple of oven pans and you can get a lot of food cooked very quickly. Choose your protein source, vegetables and carbs if desired and your good to go. I like to cook chicken for salads this way.  Season the chicken up before I recommend using the Flavorgod seasonings they are salt and msg free, they taste good and lots of variety in flavors, putting them in the oven. You want to cook chicken at 325-350 as to not dry it out.  While they are cooking, get the salads ready in the Tupperware and all you have to do is add the chicken when its done.
    • A good trick to making a salad not suck is adding texture to it and by that I mean bell peppers, raw and diced, avocado, shredded cheese, are just some things to name a few that makes a subtle change with a big taste change.
    • Another thing I like to do is cook eggs in the oven. Egg pop-ables as they are called are an easy low effort, nutritious, and convenient breakfast food that can be portable for the coach on the go.  Take a muffin tin (make sure its not your wife, or girlfriends good one) and use coconut oil or extra virgin oil both can be bought in a spray can form and still be good for you-make sure to spray the sides well, to grease the individual units and crack one egg in each. Add other things if you like for taste, some combos I have enjoyed are cut up sausage and shredded cheddar, you can even get fancy and I say that loosely, and put bacon around the muffin cup lining then crack your egg and whisk it, add some salt and pepper to taste.  Now you can cook 2 dozen eggs in less than 15 minutes.  Set your oven to 375 and cook for 20-25 minutes depending on how done you like your eggs. Makes a good healthy snack or quick breakfast you can grab. Make sure to bag them in some sandwich bags grab 2-3 eggs and a piece of fruit and you are good to go
  • As for in between food to make sure your staying satisfied between meals, practices, and meetings have some food on hand like, jerky or almonds, fruit etc…. and as always drink plenty of water.

Most of you will lose weight just by cleaning up the diet, but if you want aggressive weight loss, it can be attained.  Here is my disclaimer. From my time cutting weight as a wrestler I can tell you this, the faster the weight is lost…the higher the amount of suck it will be.  It also has a greater chance of rebounding back after.  Well, here it is, get some protein powder and you only get one solid meal a day.  One shake in the morning upon waking up, one mid-morning, one for late lunch and one after work.  Protein shake is mixed with water. Your single solid meal will be meat and vegetables, no carbs.  Again, this will SUCK!  It will however get the weight off you.  I would not stay on this for more than 20-25 days at a time.  Take a few months of normal healthy eating before repeating.  For most of us, just following basic healthy adult eating will be fine.  As a general rule, follow the 80/20 rule.  that it, 80 percent of your diet should come from the good list, and the other 20 percent is so you don’t have to be food prude all the time.

INTERMITENT FASTING

If you want an eating plan that is both healthy, effective, flexible and sustainable, then intermittent fasting is probably something you should look into.  Its not for everybody, but I find as a professional, it is by far the easiest and most flexible style of eating out there. Here is out it works:

You will choose an eight hour eating window.  If it is not in this window, you will only have black coffee, or clear water.  The window can start no earlier than 11:00am for a female and 1:00pm for a male.  For males, most guys find it the most beneficial if they don’t start their eating window till between 2:00pm to 4:00pm.  Remember, nothing but black coffee and clear water outside of the eating window.

So why does this work?  The sixteen hour fast does several things.  It allows hormone profiles to stabilize, keeps insulin production low, keeps you focused and mentally sharp because you don’t have full belly making you sleepy.  Growth hormone and testosterone production elevates when used in conjunction with lifting weights.

When you break your fast, the first meal is the most important.  Not so much as what you eat… but how much you eat.  You want this first meal to be smaller, just enough to raise insulin a small amount so you don’t have a huge spike. After an hour or two you can have a bigger meal, or dinner at home.  Usually you can have an evening snack as well and be fine.  Due to the fast and the limited time eating, you can be much more liberal in your food choices than if you spent the whole day eating.  (this is not an excuse to pig out on candy and ice cream lol) Again, I am not a nutritionist! This is taken from my own research and experimentation.  It has been effective for me, and for many others.  It is definitely worth researching and exploring to see if it is right for you!

SUMMARY

Nothing here is cutting edge or super thought provoking.  Again it goes to making adult decisions and deciding to be healthy for ourselves and our families.  It doesn’t have to be hard, or bland.  You can still eat good tasting food and be healthy.  And as always if we practice what we preach to our family and lead by example we can help shape a more health conscious community that will lead a healthy lifestyle.

CLOSING STATEMENTS

I truly hope that this helps you in your quest to a healthy lifestyle. There is a lot of misinformation out there in fitness world and my goal with this is to provide something that is practical, and something that real people can effectively implement into their daily lives.   I could make outlandish claims that this guide is all you need and will make you into a ripped god or goddess… but I will leave you with this as a set of general truths in the world of exercise and health:

  1. The two things you must have to get stronger are: consistency and progressive overload.
  2. The two things you need to get “fit” are: appropriate and consistent exercise, and proper nutrition.


Whip em with Waggle

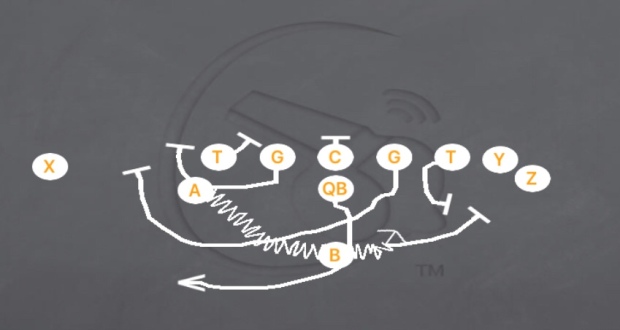
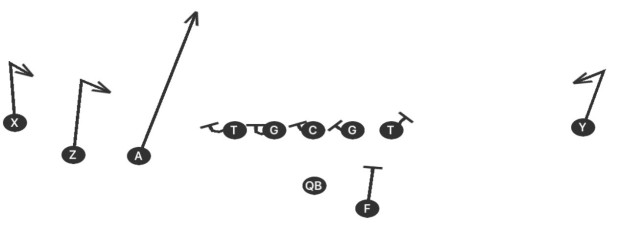
The waggle is a staple in just about every wing-T offense. It is one of… if not the most effective play action pass ever developed.  A down hill play fake, a horizontal play fake and TWO pulling guards.  The Waggle pass can be a nightmare for DBs that also run gaps to fill due to the unconventional formations that the waggle is usually run from.  While you can definitely run the waggle pass from many different formation sets including shotgun and even four wide sets; I feel it is most effective when the QB is under center so you get the hard play fakes with the QB’s back to the defense.

WHEN TO RUN WAGGLE

You want to call the waggle in similar situations you would a boot pass in, or a keep pass in.  When you see that the DE is not checking the QB, then the QB will be able to get the edge on waggle.  Now, because of what the play side guard is doing, all you have to do is wait for the backside to DE to squeeze just a little and you can get the edge with the QB.  Another good time to call the waggle is when the LBs are chasing motion, or the DBs are no longer back pedaling on the snap.

BLOCKING RULES

img_1371

  • Backside Tackle – The backside tackle will have hing protection
  • Backside Guard – The backside guard has two rules:  If the B gap is empty, he will pull play side and gain depth to lead block for the QB.  He must hesitate on his pull step to allow the FB to clear.  Once outside the pocket he will settle for the QB to pick up any bombing LBs. If the B gap is full, he also becomes a hinge blocker.
  • Center – The center will have anybody from A to A.  (he may end up doubling withe the PST)
  • Play side Guard – The play side guard will pull to the play side and pin the outside shoulder of the first defender outside the offensive tackle.  This is a position block, meaning he has to position his body on the outside half of the edge defender.  Waiting till this man is squeezing helps him accomplish this
  • Play side Tackle – The play side Tackle will have any man head up to inside of him.  this means a 5 tech does not count.  His primary rule is to take away the inside gap.
  • Motion Back – after going in motion and faking the buck sweep, the motion back will pick up any backside leakage.
  • QB – I count the QB as a blocker because his play fakes will hold defenders.  The QB will open play side faking the dive to the FB, then fake the buck sweep to the motion back, then will boot to the edge gaining about 7 yards depth.

ROUTES

img_1372

img_1373

The routs for the waggle are very easy no matter what the formation.  Simple use a number system that starts from the play side as follows:

  1. As a default, for me this is a vertical route to clear out any defenders.  Tagging comebacks and double moves is effective too! I have waggle with a comeback tag illustrated above (If running to the TE side, the TE will have a corner route.)
  2. This is usually the fullback, but could be a slot if you run it from gun.  After the dive fake tell the FB to find the easiest path to the flats.  He has a 5 yard arrow.
  3. the third receiver from the play side has a 10 yard drag.
  4. This receiver will always have a post
  5. (Optional) you can always tag the motion back on a backside wheel if you feel the defense is not paying attention to him.

QB READS

After completing the play fakes and booting out, the QB will read:

  1. Flat
  2. Deep
  3. Drag
  4. When in doubt…. TOTE IT!

Number 4 is the most important!  If the QB has any doubts, just tell him to run the rock and get what he can.

CLOSING

The waggle has been around a long time!  It can be run from multiple different looks and sets.  In the film below I have tagged a video of traditional waggle and shot gun waggle for your viewing pleasure!  Be sure to subscribe to the email list to get an update when ever you a new article drops! Follow me on twitter here at @TheCoachVogt.


DEFENSIVE IBUPROFEN

“Cover three can solve a lot of headaches.”

With the advent of the spread offense, defense has had to adjust to keep up.  Resulting in changes and adaptations in coverages and defensive fronts and movements.  All this has led to the prevalence of “Palms” and “Match Quarters” coverages.  There is no denying that match coverages have made a huge impact on the defensive football world.  I believe it should be in every DC’s arsenal.  However, people tend to forget about a tried and true coverage that is both simple to teach, and simple to execute.  It relies more on discipline than athletic prowess (yes it helps of course).  This coverage is Cover 3.  For this article we will focus on base cover 3 and its use against spread offenses.  In a future article we will go over “Match 3”.  For now, lets look at some reasons to use cover 3 as your base coverage.

  1. Simple – Cover 3 makes alignment extremely simple since you typically have 1 high safety. It’s a balanced defense for the most part.  The rules are extremely simple, especially for the DB’s
  2. High School Players on Offense – the philosophy for running cover 3 can be reinforced by the players on the opposite side of the ball. Most OC’s will smirk and say, “I’ll just run 4 verts!” when they hear about cover 3.  They forget that very few high school QBs can consistently hit the seams, or that few high school teams understand the spacing.  Or that the QB will typically have to throw under pressure due to numbers in the box…
  3. Numbers – being in cover 3 allows you to put more bodies in the box and force the offense to throw the ball. Most good teams still prioritize running the football, so let’s stop what they want to do!
  4. Impatient OC’s – I’ve only come across one OC that will throw the hitch and stick with it. Eventually they ALL go deep or try to run a double move… that’s when you get your sack, or your pick because they threw under pressure.  Stay the course and be more patient than the OC.

Let’s look at some base alignments vs typical spread sets before we get into the rules for cover 3:

2×2

img_1315

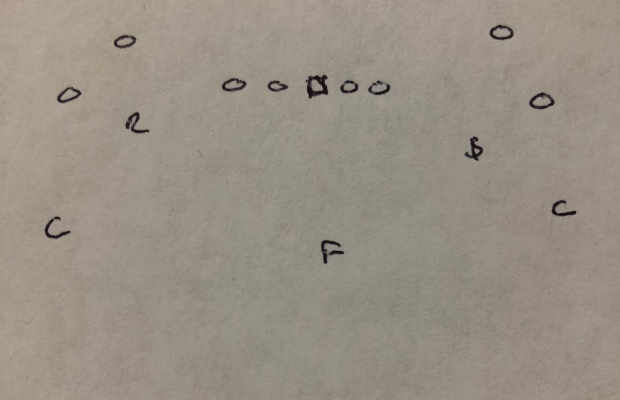
Spread tends to be the easiest offense to line up on in most situations.  2×2 is by far the easiest to deal with as far as alignment is concerned.  Your Corners and Free Safety will be 8-10 yards deep and the corners will have inside leverage.  Remember, the most difficult balls to throw are high and outside. Inside leverage is just enough to encourage the WR to stay outside on a deep ball while still playing in “confined” space.  The FS will align directly over the ball when in the middle of the field and over the B gap when on the hashes.

Your OLBS/SS will align head up to an inside shade on the slots.  You can play with their depth; I typically like them about 3-4 yards off.  Most slots are off the ball anyways and can’t be jammed.

3×1

img_1316

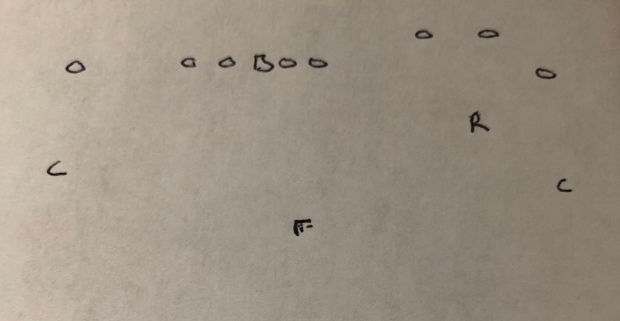
For 3×1 sets you have a couple options based on being in 2 high or 1 high.  For now, lets focus on being in 1 high.  Your Corners and FS will align the same way. Your SS and OLB will stay on their respective sides.  The SS/OLB to the 3wr side will align apexed between 2 and 3 but will back up to 6-8 yards deep.  (will cover rules later).  If you got a corner that can lock up in man coverage, feel free to bring the other OLB/SS over to the 3wr side, but you will have to slide backer’s vs motion if you do this…

20p

img_1317

Against 20p I like to keep 7 in the box.  The alignments for the FS/Corners will not change.  The SS/OLB alignments depends on the following.  To the 2wr side, he uses his 2×2 rules.  The OLB/SS to the 1wr side will align 6 yards deep over the center in the middle of the field or to the field side when on the hashes. if your using an odd front.  If you’re in an even front, have him follow the H around to take away the powerO.

Empty

You can treat it like 2×2 on one side and 3×1 on the other… or you can take a guy out of the box.  If the QB can tote it…. do the first thing I said.

RULES

Corners – DON’T GET BEAT DEEP!  That’s the number one rule.  Nothing gets behind the corner. He is responsible for the deep third of the field.  They play deep and rally to the ball once it is thrown. They don’t leave the deep third till the ball is in the air. If number 1 runs a hitch, then his eyes go to QB as he continues to sink to take away the corner/out by number 2.

Free Safety – Deep third and back pedal on the snap.  Eyes will be on the QB and can drift with the QBs eyes.  We are looking for and deep route across the middle.  Break on the ball once it is in the air.  It helps if the FS is an instinctive guy with some ability to run.

OLB/SS – against 2×2 they will have eyes on the OT to read run or pass.  If pass is read, they will collision anything vertical or inside and then drop to curl. The collision is important to reroute the WR and screw up the spacing.  If 2 goes out they will widen and drop to curl. If number 1 tries to cross face or run a slant, the OLB should clean his clock.  This area of the field where OLBs and slots play are the most under officiated parts of the field… do be afraid to get physical.  After a collision if a back crosses their face while dropping, they will widen.  Break on ball once it is thrown

Against 3×1, they will align back at 6-8 yards.  On the snap they will drop with number 2.  They will jump any flat route/hitch.  If you’re in an even front… hithes by number 3 can be an issue.  Motion back to 2×2 he goes back to 2×2 rules.  Motion to 3×1, he backs up.  If you are facing a team that effectively and correctly runs RPO’s, you will need to get into some man or some Match 3.  I will have an article on Match 3 in the future.

WEAKNESSES

Deep Outs/Comebacks by #1 – these are tough routes.  They force the corner to bail then the receiver is breaking outside.  It’s the toughest route to cover in football.  However, it is also the toughest route to complete.  If you have an offense that can consistently complete this ball, the coverage really doesn’t matter… it can be a long night if you don’t start bringing pressure or have a corner that can lock down the WR in man.

Post Wheel Combo – this route effectively mitigates spacing issues with 4 verts. Undisciplined corners tend to chase the post route leaving the wheel open. Make sure the corner stays in his third and the FS reads the QBs eyes.  Both post routes are coming to him anyways.  Fortunately, this combination tends to take a while to run, allowing pressure to get there.  “A good pass rush is better than 4 Champ Baileys”.

Smash – This is an issue because the corner rout by 2 keeps your corner deep.  Forcing the OLB/SS to take the hitch.  Train your OLB to read the eyes and widen so he can make a play on this.  Quite often a schooled up OLB/SS can break this up or get a pick.   If drops straight back, the hitch can be an issue, fortunately, most OCs wont sit there and throw the hitch over and over as we discussed earlier.

CLOSING

Obviously, there are a lot of nuances and little things you can do with alignments and techniques.  This is meant just to be guide on the simplicity of cover 3 and to show that it is still a very viable defense to use against spread offenses!  I happened to be lucky enough to be a part of staff that won 3 straight state titles, in those three years we got out of cover 3 only a handful times per season!  So, it is effective when you understand its components and limitations.  Subscribe to the email list to be updated whenever a new article posts!  You can follow me here on twitter at @TheCoachVogt and be sure to check out the STORE for the Ebooks: Installing the Wide Zone and The Speed-T Offense.

Adding Air Raid Concepts to Any Offense!

Using a simple quick passing attack in a run first offense can keep the defense on its toes.  This article is an excerpt from my book “The Speed-T Offense”. This concept can be used in any run first offense from flexbone/SBV to single wing, but if you are interested in checking out some wing-T stuff, you can get my book HERE!

The passing game covered here will be to use in addition to your current play action passing attack.  The purpose here is to put in something that is super simple but still effective.  Most of your time will be dedicated to your run game, and play action passes.  This needs to be something that is inexpensive yet will yield good results.  For that purpose, we are going to steal a concept directly from the Air raid offense so frequently seen in offenses today.  So, all that said, let’s dig in.

BASICS

First, and foremost, it needs to be simple. It needs to be simple for the offensive line, and for the skill players.  Both in protection and routes being ran.  Second, it needs to utilize high percentage routes.  Lastly, it needs to get the ball out in three seconds or less, to make it easier on the offensive linemen and the QB alike.  Here is how you will accomplish this.

The play call is going to set the formation AND the protection with one word.  We will use the words “red” and “blue” for the sake of this article, but you can obviously use whatever word you would like. Red will be 3×1 right, with protection set right.  Blue will be 3×1 left, with protection set left.  Next, you will say a number: one, two or three.  This will tell the receivers what to run. THAT IS IT! The play is called.  Here is a look at an example of each one:

BLUE 3:

blue3

RED 2:

red 2

PROTECTION

Red and Blue are your protections and formations.  A simple half slide will suffice for this, half slide is covered in depth in my BOOK.  Big on Big can work, but will require a lot of work fundamentally.  Half slide is easy to do and simple to teach, in a future article I will speak on half slide as a base pass protection.  If you want to get even easier, go full slide, however, you will need to have a fullback that likes to take on defensive ends.  There are not too many of those out there, but if you got one, full slide is the way to go.  But if you already have a base protection for drop back passing…. just use that.

ROUTES

The routes are going to be determined by the number that is called. As a base rule, EVERY receiver will have a five yard hitch.  This means they will run to six yards, turn back in to the QB and stop when they get back to five yards.  Every receiver will assume that they are getting the ball.  If the number of the corresponding receiver is called, he will then have a vertical route. (If your QB is a good one, then your WRs can run option routes. I prefer corner/post for that) On his fifth to sixth step the vertical should be looking for the ball if he is an inside receiver.  If he is an outside receiver, he will look for the ball on his seventh to tenth step.  The number “1” will be the outside receivers.  The number “2” will be the Z.  The number “3” will be the A.  If their number is not called, then they have a hitch.  Your quick screens can be used in this series as well.  This may be the simplest pass game in America right now, Hitches and quick screens… combined with your normal ground and pound offense, you will need no more.

QB RULES

The QB only has three seconds to get rid of the ball.  If he has not gotten rid of the ball in that time he will throw it out of bounds or take off with it.  He WILL NOT throw a pick! If he can help it, he will not get sacked, or at least make it back to the line of scrimmage.  Where the QB will go with the ball is going to be determined pre snap.  He is looking for a hitch to be open pre snap.  When he identifies him, that’s it. That is where is going with the ball, catch the snap and get it out there.  If there is not a hitch open pre snap, or an obvious post snap movement to take it away, he will go to the vertical.  If the vertical is not there, he runs the ball or throws it away.  Very simple, even for young QB’s.

RUN PLAYS

Running the football is NOT what this is for, as sacrilegious as that sounds.  This is a change up for the defense, and something to add some new era flash to your offense.  Your kids will like it and get excited about doing it if you limit its use.  You are going to throw the football in these formations every single time, until you get a five man box.  Once you get your five man box you can call a run play.  Pick just one to use for this series.  Good ones to use are trap, Counter and sally draw.  Trap is obviously going to hit quickest, and sally draw is going to mimic a pass play.  What you choose is up to you.  In my personal opinion, sally draw would be the better choice as you will have a body on body, and the linebackers will most likely bail.

CLOSING

These are simple concepts that can be added to anything that you are already doing!  You can even incorporate them in to your base formations.  Whether that be wing-T or Pro-i.  use the same rules for the OL and WR and you are gold!  Please feel free to reach out with any questions! Subscribe to the email list to be notified when new articles post and be sure to follow me on twitter at @TheCoachVogt


11 Signs You Played Offensive Line!

Whether you’ve played it, coached it, or both, you know that there is something special about those that call themselves offensive linemen!  Unsung heroes for those not in the know, and sometimes for those that do know as well.  But that’s OK. Its part of what makes being Hawg so great!  In honor of the trench warriors, here are 11 signs you might have played offensive line!

  1. You might’ve been an offensive lineman if… You know what its like to finish two plates before others finish their first.
  2. You might’ve been an offensive lineman if… You have experienced the spiritual joy brought forth by a clean hitting trap block.
  3. You might’ve been an offensive lineman if… You know that the worst part of practice is always jogging to the next drill spot.
  4. You might’ve been an offensive lineman if… You know that the “lineman trot” is learned skill that not just anyone can master.
  5. You might’ve been an offensive lineman if… You have experienced the anticipation for inside run because you need to shut-up that DL sumbich for all that trash talk during 1 on 1 pass rush.
  6. You might’ve been an offensive lineman if… When you knew it was you that busted an assignment, but you act like you couldn’t hear coach yelling from the sideline.
  7. You might’ve been an offensive lineman if… You understand that a proper jersey tuck under the shoulder pads can determine making it through practice or not.
  8. You might’ve been an offensive lineman if… On Friday nights you know all the other teams DL by name and what they are gunna do just by how they line up.
  9. You might’ve been an offensive lineman if… You used to bring snacks, so you don’t get hungry between final bell and pregame meals.
  10. You might’ve been an offensive lineman if…. You’ve seen the panic in a DB’s eyes because you got a free release to the third level.
  11. You might’ve been an offensive lineman if… You don’t know what words bring more soul crushing dread: “GET EM CHOPPIN!” or “TO THE 5 MAN!”

BONUS:  You might’ve been an offensive lineman if… You know that you have a group of life long brothers that will have your back till the day you die!

Sign up for the email alerts to get notified anytime a new article is posted!  Follow me on twitter here at @TheCoachVogt and be sure to check out the STORE for EBooks and Merchandise!

10 Ways to Sell the Wing-T

There is no denying the success of the wing-T offense.  It has perforated into all levels and all offensive styles today as described in a previous article (A Legend of the Fall).  However, choosing to run this system in today’s age of flashy spread schemes does come with a few speed bumps that you must overcome.  This is mainly due to stake holders like parents, boosters and players simply not understanding the offense, as all they see on tv is what they want to do.  That’s not just football, that is life in America.  The masses tend to emulate what they see on tv and other media outlets.  But for those of us who know and understand the offense, we know that it is simply the most cost effective and adaptable system available.  Hence, the wide spread use of its concepts from youth leagues to the NFL.  This article will give you 10 easy ways to help sell the wing-T offense to your players, parents and other stakeholders in your program.

  1. The ball is spread to multiple playersWhen run correctly, this is a true spread the ball around offense. At minimum it is a 3 back offense, 4 if you incorporate the QB in the run game!  Due to the deception and ball hiding nature of the offense you don’t need a dominant player at WR, QB or RB, (of course it always helps when you got one lol…) but, you can spread the ball around while faking it to the other players, forcing the defense to spread itself thin to account for multiple ball carriers and to play assignment football or they risk following the wrong player!  As far as who is getting the rock, it is hard to beat the true balance of the wing-T offense.  Use this when selling to your athletes.
  2. History of successHistory is on the side of the T based offenses. Most other offense produce “flash in the pan” success.  They will be good for a year, two years, and then back to obscurity. Especially with spread teams!  If they can’t recruit a DUDE at QB every year… its hard for them to stay consistent. While the teams that run a T based offense are consistently good, regardless of talent levels.  I don’t need to convince you of this, simply think of the successful teams in your state, or district.  Good chance the ones with sustained success are ones basing out of T concepts.  On top of that, its very easy to call plays in the system.  I detail that HERE. Use these things when selling the wing-T to your coaching staff, boosters and AD.
  3. If you can play, they will come“You won’t get recruited by a college in a wing-T offense” what a completely ASININE statement! Yet I have heard it multiple times!  This tends to be a thing repeated by players as why they would transfer…. Lets be real about this… this is from ignorant adults, not kids.  The ranks of college and the NFL are FULL of athletes that played in the wing-T or a derivative.  Hell, you still see the Wing-T in the NCAA and NFL today!  One simply needs to show this to the kids and parents with real statistics to squelch this silly rumor. 9 times out 10 this is told to players and parents by “street gurus” that have an investment in a rival school.  Like most things in life, look at the motives behind what somebody says and the light will shine on their true intentions.  Fact: it does not matter where you play ball at… if you are good enough, the recruiters will come.
  4. VersatilitySomething that I believe is unique to the wing-T offense is its versatility! There are more ways to incorporate wing-T concepts than you could ever do in a season.  Double options, triple options, shot gun, pistol, gun option.  People are even running the wing-T out of 4 wide personnel groupings.  It is truly adaptable to any skill set your players may or may not have!  This is reflective of the wing-T’s pathogen like infection of every offensive system you see today! This is also why you will see sustained success with wing-T teams. Target your coaching staff and AD with this one.
  5. Change NamesSimple word change propaganda goes a LONG way. Case and point:  in the 1980’s the Afghanistan militants were fighting against communist Russia and the USA called them “Freedom Fighters” and even supplied weapons and training.  Fast forward to the 2000’s…. and well, we wont get into all that, but you get the idea.  What I’m saying is… change the terminology to pander to the minds of your athletes!  Call your base wing-T formation “Spread rt” and “Spread lt”!  instead of calling the Fullback a Fullback, call him a B back… or even better, call him a Tailback! Instead of calling the wings, wingbacks… call them Slots!  You know they are wings… but that simple title change goes a long way.
  6. It’s a Team first offenseThis is the ULTIMATE team offense. Your Backfield and WRs will be selfless and block or fake on play they don’t get the ball. Which will help them, when they do get the ball.  Your skill guys know that if they block hard, or fake with conviction, the same will happen for them when they get the ball.  This is self-promoting!  This happens on its own with just some guidance from the coaching staff.  Everybody knows they will get the ball, everybody is involved in the game.  There is no need for that one WR that gets the ball every other play.  It is a true team system, that helps lead to a IDENTITY.
  7. It makes the defense tougher
    1. There is simply no arguing here. This type of offense is down hill and physical with high frequency, further building the team IDENITY. This forces the defense to develop an edge and a hardness that they simply cannot get by lining up in space every snap and playing tackle 7on7. This tends to ruffle feathers when I say this to folks… but facts are facts.  Furthermore, the nature of the offense means you can run the clock and have your “better” athletes play defense!  Your DC will be your new best friend.
  8. It’s DifferentBeing a wing-T offense you will be different. You will be something that, with a good chance nobody else you play is!  This will cause your opponents to have issues defending you.  They will be used to playing against 4 wide and shotgun 20 personnel all season long, and in practice against themselves all preseason and spring.  They will only have week to get ready for your formations and deceptive ground and pound offense.  Your players will also discovery that they are different, than anyone they play against.  This further leads to building an IDENTITY!
  9. Angles and NumbersThe use of angles may be the single biggest advantage of this offense! Your blockers, OL or Skills, will never have to drive a defender backwards, they will always have an angle to their blocks. This allows you to use smaller or less athletic linemen and still be successful.  The entire system is based on taking what the defense is not defending and getting there with as much speed and simplicity as possible.  The formations of the offense allow for extra run gaps to be created while still posing a vertical passing threat.  This creates a natural conundrum for the defense. They can load the box and expose themselves to the Play Action game, they can defend the edges and give up the quick hitting inside game.
  10. IdentityDifferent, hard nosed, team first. This all leads to strong sense of identity for your players.  You will watch your players start to take pride in the fact that they run this offense.  As somebody who has run multiple offensive schemes, I have not seen this happen with other offenses.  This sense of identity is self-feeding into the team first, hard nose nature of the system.  But don’t take my word for it!  Watch this video and then try and tell me these kids (and Coaches!) being interviewed don’t have a strong sense of IDENTITY:

https://www.youtube.com/watch?v=JOrwXVlpFfU

Bonus: It’s Fun!  Fun to call plays, fun to watch on film. Fun to coach. And ive NEVER had an offensive lineman that did not LOVE the offense.  OL enjoys the offense…. Nuff Said.

Be sure to sign up for my email list to get updated any time a new article posts!

Follow me on twitter here @TheCoachVogt

Check out the STORE for books and Merchandise!!!